Friday, September 23, 2016

Starting to gather steam, at last!

As ever, I thought I would get so much completed and then failed miserably!
I hadn't realised just how ill I had become.
I was forced to retire early on medical grounds last March and have been steadily trying to get better ever since. I have tried Mindfullness courses that have helped a bit and had some hearing aids with special white noise generators built into them fitted. They have made a big difference but it wasn't until in the summer, on a beach, trying to take them out and go swimming, when I realised how much I now rely on them.
Anyway, modelling. The etches from last year have been made up as much as I could - still just finishing the loco. They needed a bit of tweaking as I said when I saw the brass. I spent some time recently feeling better so have started on this task.

The pictures show the Type 8D, a Craven 2nd at 4mm scale. A bluebell survivor albeit in bits at the moment. This is the third carriage from Merton at Wimbledon in the 1870s in the photo on page 111 of Vol 1 of the fabulous White, Turner & Foulkes books on LB&SCR Carriages.
I have a few minor corrections then this will be etched to order, expressions of interest please.

Mike Waldron has been so patient waiting for the Craven Brake Van with Birdcage and Ducket so that will be next. Again, I tested this about 8 years ago (!!!!) and it just needs to have the body to underframe join sorted out and the position of the birdcage sorted out so the top fold over from the sides can be removed where this occurs.
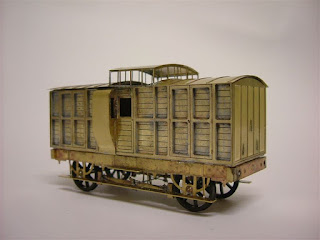
This is the one I am referring to. It will be slightly more expensive that other carriages as there are four layers of etch to build up the framing and so it is almost a full A4 size etch.

I have also found the 6 wheel underframe I worked on. Some of you have asked for these. I will get some etched to order.
I think I changed the brakes to be more slender and may have also given it springing. I will look out the drawings.

There are various other completed etches that I can order: Dia 18 saloon, Dia 38 1st Coupe, Dia 23 and 24 the 2nd saloons, Bullion van. There were others but those have already been etched now.

In 7mm, I have sent off for some more copies of the Type 13A Craven 1st. They will be available at the AGM for £36 each. Postage extra if not collected at the AGM.  I shall have 6 spare to sell then unless people reserve them first? They are at the etchers now as well as a couple in Gauge 3 which seem huge!

I will try and progress the locos and other etches a bit by then also.

Well I will bring things to the AGM as I have the rail ticket already bought this year and hope to see you there. I will try and update some more before then.

Many thanks for your continued support, I have needed it!
Cheers, Ian

Tuesday, September 15, 2015

The etches have arrived!

Received a nice parcel this lunchtime. Just looking through them now. Have made a few errors on the carriages but the loco and tender looks fine. I think the tinnitus stopped me checking things
as thoroughly as in the past hence a few silly errors. This is the loco body etches.
the tender body etches.
and this is the nickel silver chassis parts.

The Craven 1st has a
few errors and only one end! The Craven 2nd is better, I think this is all okay apart from the ventilators above the doors.
The Dia 51 Meat Van looks okay.
The Dia 49 Bullion Van has a couple of issues, it etched okay last time but needs some sorting this time. I don't understand why at present so will spend some time looking at any differences between the etch drawing a few years ago and this one.
There were also a couple of other bits, one was C2X brakes and springs for a member but there will be a couple spare.
So, that is what has been received. I had better try and get some completed before the AGM.

More later.


Sunday, September 06, 2015

Progress at last but in a slightly different direction

Hi again!

I have been off work since May 2015. Unfortunately after the last post, I was ill again and then busy getting back to work and keeping the Brighton Circular magazine in production which has always taken a huge chunk of my available modelling time. Most enjoyable as it allows access to some marvellous sources, photography and people but it has never been an easy publication to put together.
As many of you may know, Klaus, the Editor, has also been ill and has had to stand down. I have very severe tinnitus and from May through to only a couple of weeks back, it was so intrusive as to severely interrupt my thoughts so much so that even connecting sentences has been difficult. My brain hurts!!! (Monty Python interlude)

I have had an MRI scan and the noise of that was still less than the tinnitus noise in my head! I am having therapy and am learning to concentrate again. In fact, my consultant expressed the use of a computer to draw things technically as a very good therapy as I can put autosave on, make copious paper notes or electronic ones, and gradually use it to extend my span of concentration. He suggested I start on a new project.

So where are we going with this?

Well, a Craven loco! I still haven't finished the Craven Goods but have a good idea now on what needs doing but in the meantime, the new project is 153/4, 1862 single which became Spithead and Southsea.
I have finished the etch drawings and they are at the etchers at the moment. I have drawn them for all 3 4mm gauges and I have also got a set ready for 7mm. The 4mm ones are at the etchers. IF ANYONE IS INTERESTED IN A SET FOR 7MM PLEASE EMAIL ME. A ROUGH ESTIMATE OF £125 FOR THE 7MM ETCHES.
I am looking at getting parts cast in 4 and 7mm via Slaters. I had a chat with David White yesterday at Telford, my first trip out since May! The 7mm wheels would cost £69 for the complete loco and tender as the tender needs coach split spoke wheels. The loco and tender have been designed to be sprung or solid or a bit of both. It is the Craven version as pictured. The Stroudley rebuild needs an almost complete new loco body but that can be done as well, later.

I am also getting carriages etched. There is a Dia 51 Meat Van, a Dia 49 Bullion, a Craven 1st, No 204 and a Craven 2nd No 35. The latter two are as per those at the Bluebell and any profits go to the Craven Carriage Fund. These are being translated into 7mm as well as they would look lovely behind a Terrier! Yes I bought one!


I also have several other drawings ready for the etchers - the Craven 2nd type 8B, the Craven 1868 brake van with duckets and birdcage (although I may get the framing laser cut), Dia 23 and 24 Stroudley 2nd Saloons, a Dia 22 First saloon, a Dia 18 First saloon, a Dia 39 1st Coupe, and two I have to check with Mike Waldron about. The Dia 40 1st brakes and the Dia 42 Lav Compo, both of which have been shown as test etches on here and have been seen at the Brighton Circle AGM the year before last. I don't know if he has actually got these into production or not.

Then there is the early Pullman carriages to complete. Almost there. And I am looking at the matching carriages for the Craven 2nds, as per the Wimbledon photo of Merton. The second and third carriage are already completed.

So, hopefully, I will be keeping this going in a bid to get better with my health, and also to try and use the modelling to relax with as well.

Lastly, the Brighton Circle need help in the production of the magazine. Not difficult, just a bit time consuming. Done on Publisher and sent electronically as pdfs for printing. Let the secretary know if you can help please.

Do please express interest in the 7mm especially but let me know if anything whets your whistle. I will get etches done soon.

Sunday, February 09, 2014

Carriage etches almost ready, everything seems to take so long though!

Hi again,
I am trying to keep modelling but seem to have huge gaps between time at the workbench. There are many other interests and demands on my time and modelling or developing etches always seems to get put back! Very frustrating for me as well, I suppose for others that would like some of them!

I am hoping to find time in the next couple of months after I have the new printing process for the Circular sorted out.
Cheers
Ian

Monday, April 30, 2012

Started making up the test etch at last!

Hi again, after another few months where I haven't been able to get anywhere near my workbench.
I have found that, mostly, things have gone together okay. Very pleased with the firebox front and the cab suround.  There are a few problems - the wrapper for the smoebox, boiler and firebox are a couple of mm short! The inside motion doesn't really work with the hornblocks I have fitted so looking for some thinner ones and the holes for the coupling rods and the outside cranks are slightly too large.
I forgot to make an allowance for joining the body to the chassis!

I am off work with something that makes me keep falling asleep at the moment so am trying to do something when I can! My boss said go and make a train so I am trying!

Cheers for now, hopwfully some progress in the next couple of days or so!

Friday, August 05, 2011

Hi
Still struggling for time since taking over the Circular. I have not progressed one jot! I am hoping to see some changes soon so don't give up!
Thanks
Ian

Tuesday, June 22, 2010

This shows some of the parts for the fully able to be modelled brake gear.

This is showing the tender with some parts - like the tender front just placed on - the folded up tender outside frames.


This view is looking into the coal space showing the curver sandboxes at the front of the tender. Filler caps fit over the holes in the top part yet to be added.


This shows a general view of most of the parts of the tender. Bottom left are the side overlays and the angle iron joining strip to go at the top under the footplate. Tender top toolbox parts are shown but there will also be two other options - one at the rear on the footplate and two on the front of the footplate by the handrails.


And this is a close up of parts for the tender chassis. Fixed, compensated or CSB is catered for without cutting but the usual 6 x 4 mm cutouts can also be done.


I have a lot to play about with and am learning to use my lathe and milling machine to produce parts for masters for casting but I may be asking people to help with this for a reduction in price of the kit or a free one! Any offers as it will take me ages at the rate I am able to work at these things!


More in a few days once my eye has settled and I can get back to my workbench!
Regards
Ian


This picture shows the parts separated and shows the slot that slips over the centre axle. There are other parts to be added to this but, having had a bit more time in hospital today checking my right eye is okay, I am finding it hard to see much tonight so this is as far as the loco chassis is going to get for a couple of days!

Monday, June 21, 2010


These three pictures show what I have managed so far - been far too busy on other things unfortunately!
This is the inside motion that I'm trying to get sorted to just fit over centre axle. One shows the parts on the etch, one shows the parts loosley put together with some of the slidebars etc and the other shows the parts placed over the axle separate from the motion plate and slide bars.
Have also got half the tender assembled and will put up a pic tomorrow.
Not too many stupidities so far! But a bit of redrawing needed!
Cheers
Ian

Friday, June 18, 2010


Last set of etches is mostly the tender.
Right lower the frames etc. Above is the tender footplate toolboxes, the rear toolbox and the injector cover over the firebox for later on in their lives.
Middle is the main frames for the tender with the brakes and linkages, etc.
Above is the springs etc.
Far right lower, the body of the tender and above it the footplate, front, back etc.
Really looking forward to seeing how it all goes together.
Watch this Blog!

Second set of etches for the loco.
Bottom left is all the inside motion parts as described earlier. They are static and slip over the middle axle.
The P4 motion bracket has etched okay on this so will have to investigate why not in EM/OO as similar dimensions.
I have just noticed that PPD have etched the parts again so I do have a full set correct so I can test build in all guages once I have wheels.
Above this is the outside cranks.
Above those are the Stroudley numberplates. Above that the wheel balance weights.
Next right are the loco frames and lower smokebox sides. Compensation parts and also for CSB.
Furthest right is the springs, spring hangers, coupling hooks, reversing lever, cab trim and the safety valve levers.


The etches arrived today! This shows parts for:
Top left boiler, smokebox, firebox, splasher tops, outside frames overlay, footplate overlay.
top right smokebox, boiler and firebox formers and cab, splasher sides, motion plate upper.
Bottom left is the outside frames/footplate unit, buffer beams, cab extra sideplates, sandboxes and linkages, outside hornblocks for outside frame.
bottom right is the coupling rods - jointed with correct knuckle or solid.
Middle left is the Craven numberplates and the works plates.
Middle right the frame spacers for P4, EM and OO. There is a slight problem on this sheet with the motion plate in EM and OO.Firebox lower sides and front.

Saturday, May 29, 2010


I have started to design my first etched loco!
This is the Craven Slaughter Standard Goods as in the photo above.
I have just sent the first drawings to the etchers for a trial and hope to get the tests
back in week or so. I am thinking of showing what I'm doing on an RMWeb page as people have
asked me to do that.
It has taken a while to get this far but I have set myself some high standards to attain. I
have included all the under-boiler motion as a rigid unit that fits over the middle axle so there are no cranks actually on the axle etc as such but it looks like there are! It all seems to be okay on the drawings and in my mind so I am waiting with great anticipation for the nickel silver and brass to get to me so that I can see if ideas have worked!
I am now drawing up a similar loco which has a Cudworth coal burning firebox, 8 ft long! A lot of commonality between the two types so this should be quicker.
I have already said to a 7mm modeller that if someone will sponsor the photo tool, I will do the changes necessary for this to be made available in 7mm as well, as etchings only.
I am also working on a Sharp's early loco, as in the Barnam Junction photos. A 4 wheel tender for that and it will include some of the differences for the SER version. That will take another few months though.
Right now, I am trying to get the Summer Brighton Circular ready to be proof read but having had an eye operation recently, this is taking longer than usual.
Then there are masters for patterns for the loco and trying to get the Craven Brake Van and the Stroudley 2nd Saloon coach ready.
Hopefully a little shorter beteen postings when another one of these get done!
Cheers
Ian in Blackpool

Sunday, October 05, 2008


What the castings look like

This is a photo of the castings I am recommending in the instructions. The buffers look good, the oil lamps okay but I am not convinced yet by the axleboxes. Do any of you know a source of 7mm axleboxes?? Please let me know. The buffer pads are soldered up from parts provided in the etch. Right, I have been informed from Australia! that I have the wrong set of MetroCam axleboxes! There are 2 types, the CS33 is much nearer what is needed. I have shown the CS28 type, I have now ordered some more but the instructions say the wrong number! If you have bought an etch please order CS33!!!!!


I have been asked about roof fixing. This is my method that was shown to me by Alan Sibley on an industrial diesel, I think, in 4mm. A piece of scrap etch soldered just off the centre-line at the top of the ends. There are three clips, again from scrap etch, along the underside of the roof. Just slide the pre-curved roof into position ensuring the clips locate and slide over the lengthwise piece. It works for me. This, version 2, has bolt fixing holes for body to chassis locating.

Friday, October 03, 2008

Craven 1st Version 2


This is what I have been assembling since it arrived from the etchers yesterday.
This is the second version of the Craven 1st of 1864. This is 7mm and has all the corrections needed from the trial etch and can also be built in the later period as shown here with the continuous upper footboard, as well as the earlier version as shown previously and in the further part of this photo which is the carriage built from the original test etch with the upper and lower footboards.
Everything has worked very well and it is this version that is being sent out. I have some available if people are interested. Full instructions provided but you have to buy your own castings from Prestige and Keykits. I am also working on a card interior kit for this carriage. I'll hopefully get something posted this weekend.
Cheers
Ian

Tuesday, September 30, 2008

Great!

Really nice to see so many at Scalefourum and even nicer to see Dave has made one up already! See http://lbscr.blogspot.com/
I will be looking for others made up model photos to feature too! Dave's is the version 2, the version 3 will be on sale soon and is the one in the etch drawing, at 4mm.
Cheers Dave

Thursday, September 25, 2008

Scalefourum
I will be there Saturday and try to have some samples with me of the Craven 1st, the Bullion Van, the Stroudley 2nd Saloon and the 6 wheel suspension system.
Hope to see you there
Ian

Sunday, September 21, 2008


The completed (almost) Bullion Van.

Well, I've still got to fix the roof onto the body (hence the gaps) and paint and letter it but this is what you get. I'm quite pleased with this, the first time I've had a go at strapping on anything and I tried to get the layers looking something like the real thing and give the impression of the massive hinges. £25 plus post and packing to you!
Time to get the Craven 1st finished now.
Ian

Sunday, September 14, 2008


For Sale


7mm Craven 1st etches available now. The original drawing has been modified as shown above. I have added a high footboard for Stroudley period, end lamp irons, foot steps, made the holes for the bearings the correct size for 7mm, made the door hinges protrude slightly more, got rid of some slots along folds in the chassis that showed and provided a perforated strip to make up your own oil lamp enclosures if you feel that way! The initial order has been satisfied. Any other people wanting one of these, the cost will be £45 per etch plus postage, per etch.
The photos earlier are of the initial trial. What you would get would be a copy of the above.

I am slowly getting a list of where to get appropriate castings for this.

There has been enough interest in this, and some people kindly sponsored the 7mm trial, so as I get 4mm kits ready, which they are almost now, at long last, I will make a 7mm version available as well.

4mm kits - again the Craven 1st will be ready by the end of September.
As a set of etchings for £30, I can supply castings as well but I think Chris Cox's are better.
see http://www.5and9models.co.uk/

The Bullion van has worked out well, so this is available with all castings at £25 plus postage.

The Stroudley 2nd saloons, either diagram 23 or 24 will be available next at £30 for etchings only or £35 with castings. Postage extra. 7mm will be available shortly after. Etches only at £45, castings for these are already available from other sources. Dave at Roxey http://www.roxeymouldings.co.uk/ has some and
Laurie at http://www.lgminiatures.co.uk/ has others listed in his catalogue.

I am trying to get the Craven outside brake finalised after that and then will be working on the 1866 3rd Brake and all 3rd for 7mm and 4mm and that early Pullman.

I am about to send for another set of numberplates so if these are wanted please email me.

Prices quoted are those at September 2008 and may have to increase in the future.

Cheers for now

Ian

Tuesday, September 02, 2008


Bullion Van

I spent some time yesterday evening putting all the bits on to the first side of the Bullion Van etch. I am quite pleased with the multiple layers that I have achieved here and I have included a jig so, after tinning, evrything went in the right place first time with minimal fiddling, the hinges locating all the strapping in their correct place with the help of a handle top and bottom that I have now cut off. More later when I have done the other side and got a bit further on over this week.