Saturday, November 02, 2019

Craven Slaughter Goods Kit


I am cracking on with the instructions and thought I should post a couple of the drawings that will be part of the instructions.
These show the etched parts in a red/white combo; grey is the printed resin parts and yellow are the bits of wire, handrail knobs, bearings/hornblocks that I will not be supplying. I asked a couple of people about this and was told by both that they replace the bearings with hornblocks anyway, but they had different preferences for those and that the wire and handrail knobs were not a problem as they always have some in stock. It saves an enormous amount of time and money if I don't supply those parts, and allows me to keep the price to £100.
The alternative versions for the loco springs are shown behind and to the left of the body parts. As are the different types of smokebox door dart, safety valve, chimney, sand boxes with operating links, whistle, cab side sheets, smokebox blower control and injectors for the loco, and the alternative springs, rear toolbox and front tool boxes for the tender.
All these are for the Slaughter Standard Goods. I plan to get two other types available later next year; one of the Cudworth types and one with the remaining two different cab sheets. They will be offered in the same format of mixed resin prints/etching.
I am just awaiting the etches for the 4mm version and am printing off the resin components at the moment whilst writing/drawing up the instructions.
The chassis have three widths of spacer on the etches and provision of full compensation is built in with twin side beams provided and location for a single rocking axle also on both the loco and tender chassis. Coupling rods are provided for either using compensation or not.
There will be an inside motion unit available later as a resin print.
Both Craven and Stroudley number plates will be available when I get the kit etches as they in the same order.
I will be shipping these by the last week of November and then again in February. I am also hoping to have 7mm versions available by the March Windmill Meeting of the Brighton Circle.
Back to the instructions!


Thursday, October 24, 2019

Craven Slaughter Goods available mid November

I have heard back from the etchers today that the Craven Slaughter Goods etches will be me about 7th November so I should have them packaged and ready to go to people by mid November. They will comprise of the etches, the resin castings and the instructions. I am not going to send bearings, handrail knobs or wire with the kits as I am trying to simplify operations somewhat and also trying to keep the costs down and ease the cashflow at this end.


Variations supplied are for the chimney, safety valve casing, cab extra side sheets as well as the footplate sandboxes at the front and I will supply two sizes of splashers for scale or OO/EM flanges. Also different combinations of tender toolboxes and springs.

The photo a couple of posts below shows the resin castings parts and the cab will also be supplied this way but is also on the body etch. As seen at the Brighton Circle AGM.

By getting rid of a lot of the brass and nickel silver etches and replacing them with the resin parts - the firebox, smokebox, springs etc - I have been able to keep the price to a what I consider reasonable one of £100. This will still need you to purchase wheels, motor and gearbox, paint etc but also you will have to supply the type of bearings you want to use and the wire for the handrails.

Wheels are 5 foot outside crank for the loco and 4 foot for the tender. The chassis are designed to use standard top hat bearings for one eight of an inch or two millimetres as appropriate and there are cut out ready to accept the standard hornblocks for those who wish to use them. There are also compensation beams included on the etches. I designed this for a small Mashima motor and a High Level gearbox driving the rear wheels. I will look into the current availability and post my recommendations on here soon.

I have been asked about the outside cranks, which are Resin castings to fit one eight inch axles and use Alan Gibson crankpins. I know some people have used this system well but others are taking the approach of either buying Alan Gibson or Markits versions. The Alan Gibson ones can easily be altered to the correct shape, I haven't used the Markits ones so cannot comment.

A drop in inside motion casting is being developed and will be available next year.

The kits will be supplied in an A4 sized, 1cm thick postage box that I can send as a large letter.

I will be able to supply either Craven or Stroudley numberplates for an extra £4 if bought with the kit.

Reservations now being accepted.

Cheers
Ian

Sunday, October 20, 2019

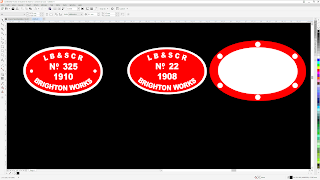
Works plates for J and I3?


Is this the type of works plate someone was asking for the J class and the I3 Class?
Cheers Ian

Monday, October 07, 2019

Craven Goods castings

This photo shows the castings that I have finally got printed on the resin printer, ready for the Craven Slaughter Goods model.
This shows for the Loco: 
Chimney - original
Chimney - Stroudley style
Dome
Safety Valve - original style
Safety Valve - boxed in style
Whistle
Springs - early
Springs - late
Buffers
Clack Valves
Smokebox side lubricator - small
Smokebox side lubricator - long
Safety Valve Spring columns
Smokebox Door
Smokebox door dart
Cylinder Cover Plate/frames
Sandboxes on footplate
Pipework unions after clack valves
Injector pipework 4 way union ashpan side
Outside Cranks
Splashers
Smokebox unit
Firebox unit
Buffer beam
Reversing lever/unit
Smokebox damper control
Regulator
Boiler level sight glass
and for the tender:

Springs - early
Springs - late
Axleboxes
Wooden brake blocks
Buffers
Brake handle
Water filler
Tank Top Tool boxes
Sandbox lids
Rear buffer beam
Front buffer/damper
Underfoorplate water connector
Tender front toolboxes
Tender rear toolbox
Bucket
It has taken me far longer to draw all these and then get them printed on the 3D printer with a resolution of 0.002mm so I may not have a finished demonstration model at the AGM.
Cheers Ian

Sunday, April 21, 2019

3d printing while looking at a stream!

Just looking at Gary building one of Linnys kits at https://www.youtube.com/watch?v=clBUBXF7_-o
Excellent quality and able to interact through text 'chats'. So here are some pics of the bits I was UV curing whilst listening!

Some bevel gears for Type 15 brake vans in G3 and 7mm but have some in 4mm but very small!
The other is 4mm bungs for oil lamps - trying a print at 0.002mm resolution to see if the handles would come out in 4mm scale! Only just! The wheel insert is for Mike Waldron as he is doing something that needs a 4' split spoke wheel centre. Slowly getting the hang of the 3D software!
Cheers
Ian
And here is a photo of some other bits - door vents, Craven carriage bits, Pullman bogie sides in 4 and 7mm. Lots more going on, really enjoying the 3d work!

Sunday, March 31, 2019

The next development

Well some of you may have read on RMWeb or Western Thunder about modellers using the latest type of resin based 3D printers. I was reading Mike Trice's posts https://www.rmweb.co.uk/community/index.php?/topic/142773-anycubic-photon-3d-dlp-printer/
and saw he had bought one from Amazon recently and he was having great results from the start. I idly flicked over to Amazon and they were having a sale that day, £90 off list price! Too much temptation! I have been thinking about this as I have tried making the castings in various materials over the years and have a whole load of etches that need castings to get things complete. This is the answer.
I also found I could download Fusion 360 for free - a 3D CAD programme and so I did and found some excellent, simple to follow tutorials from Warwick University aimed at school age students and did them and then started to see what I could draw for the LB&SCR modelling.
So, a loco I started about ten years ago was the Slaughter version of the Craven Standard Goods. A lovely looking beast. I didn't realise the complexity of outside frames etc and all the twiddly bits of Cravens engines. I had some etching completed and soldered some of it together, it wasn't far out but the outside frames slot for the axleboxes was too large and I had no castings! Well, I have now and am redrawing the etches to be able to complete a mixed media kit. I had great trouble with the appearance of the loco springs from layers of etching and the firebox curves back and front were made from about six layers of etch soldered together and filed up. Not any more as I have managed to draw all these and a great deal more in the 3D CAD and then print them. The last bit for the loco body has just come out the printer and so I will start on the tender and other parts next.
I have been drawing the parts in both 4 and 7mm scale and will continue to do so. Things will appear of EBModels website when ready to sell but I will try and keep this blog going to show you developments as they occur.
I am pleased that my general doom and gloom after last Novembers burglary has been got rid of through a combination of friends chatting and this new toy! I intend to try and get a whole load sorted over the next few months so stay tuned!
7mm parts at front and left, 4mm parts at right rear. At last the springs will be in one piece and not from loads of etch layers. I am very pleased and want to get other bits sorted now and then get some things finished, aiming for October AGM of Brighton Circle to have kits ready.
Cheers Ian